Mad Science
Before you drag out your canning equipment for the new season, it's a good idea to review some basic information.
Can you boil water?
Water boils at 212 degrees Fahrenheit. Sometimes. Actually, water boils at 212 degrees Fahrenheit at sea level. Here in the western Rocky Mountains, sea level is a long, long way down there. So we must make adjustments in our cooking, if we wish to obtain optimal results. Here, more than anywhere else, good cooking is an art that requires a light touch, a gentle hand, and hard-earned knowledge. So even if you live at a lower elevation, those camping trips to the mountains can result in raw boiled potatoes and tepid hot chocolate, if you don’t take steps to correct for the change in altitude.
Physics
The reason for this is simple physics: As elevation increases, the boiling point of water decreases. At 4,000 feet elevation, water boils at 204 degrees; at 8,000 feet, the boiling point is 197 degrees. The lowered boiling point is 1.9 degrees for each 1,000 feet increase in altitude. This means you must cook your food longer, once it begins to boil, to get it done. In baked goods, decreased pressure causes leavening gases to expand more and moisture to evaporate faster, and because high altitude areas are usually drier than lower elevations, flour may be drier and doughs may require more liquid to reach the proper consistency.
This is important for the home food preserver. If you are using the boiling water bath method, additional processing time is required. If processing time is 20 minutes or less, add 1 minute for every 1,000 feet of elevation above sea level. If processing time is over 20 minutes, add 2 minutes for every 1,000 feet of elevation. If using a pressure canner, the processing time will not change, but the pressure needs to increase 1 pound for every 2,000 feet of elevation.
To find your elevation, enter the name of your town or locality into this website: www.topozone.com/findplace. You can also put a pan of water on the stove to boil. Suspend a cooking thermometer in the water, being careful to keep the thermometer from touching the pan sides or bottom. Leave the thermometer in the water for a few minutes after the water starts to boil, to allow the thermometer to reach its maximum temperature.
Mountain Baking Mysteries
Do your cakes tend to fall? Do your brownies stick to the pan? Altitude, not attitude, is the culprit. Most recipes for baked products are geared for sea level bakers. Always grease your baking pans thoroughly, as cakes and breads tend to stick more when they are baked at high altitudes. Using a larger size pan can also help. Above 3,000 feet, decreased atmospheric pressure may cause a cake to rise too quickly, causing its cell structure to overexpand. You want to raise the oven temperature 25 degrees, so the product will bake faster and set the cell structure, so the cake will not fall. Many mixes that require adjustment for high altitudes have specific directions right on the package. Be sure to look for them.
Angel food and sponge cakes present special high altitude problems. The leavening gas for these cakes is largely air. If you beat too much air into the egg whites, the air cells overexpand and collapse, poor dears. Aim for a gentle peak that falls over gracefully, not one that’s stiff and dry. Using less sugar, more flour, and a higher baking temperature also helps strengthen the cell structure of foam-type cakes.
Pound cakes and other rich cakes benefit from reduced amounts of fat.
Yeast bread dough benefits from higher baking temperatures, more liquid, less yeast, and more and shorter rising periods. The dough rises more rapidly and can over-rise easily, so let dough rise for a shorter time. Because flour dries out more quickly, use the minimum amount called for in a recipe, or use 1/4 to 1/2 cup less than the total amount.
Fancy breads contain more sugar, which makes them brown too fast at high temperatures, so they should be baked at 375 degrees.
Boiled candy and cooked frostings (sugar mixtures) become concentrated more rapidly because of the faster evaporation of water. Watch them closely to prevent scorching. Reduce recipe temperature by 2°F for every 1000 feet of elevation.
Cookie recipes often can be improved by a slight increase in baking temperature, a slight decrease in baking powder or soda, fat, and sugar, and/or a slight increase in liquid ingredients and flour. These changes increase the strength of the batter and improve its ability to retain the steam long enough for a crust to form. Many cookie recipes contain a higher proportion of sugar and fat than necessary, even at low altitudes. For more nutritious cookies with fewer calories, up to one-fourth of the sugar called for often can be replaced with nonfat dry milk powder without loss in product quality.
Quick breads vary from muffin-like to cake-like in cell structure. The cell structure of biscuits and muffins or muffin-type quick breads is firm enough to withstand the increased internal pressure at high altitudes quite well without adjustment. However, a bitter or alkaline flavor may result from inadequate neutralization of baking soda or powder. In such cases, a slight decrease in the baking soda or baking powder usually improves results.
Quick breads with a cake-like texture are more delicately balanced and usually benefit from adjustments for altitude. Trouble signs include: a porous, sugary crust; a coarse, gummy, or oily texture; and a low volume in proportion to weight. Try a slight reduction in the proportion of leavening agents, sugar, and fat, and/or a slight increase in the proportion of flour, eggs, and liquid ingredients. Appropriate selection of pan size and baking temperature also are important.
Cooking is definitely an art, but it’s an art that benefits from knowing a bit about chemistry and physics, as well. The Rocky Mountain Cook knows, “It’s not done when the timer goes off. It’s done when it’s done.”
Sources:
www.gofallon.com http://www.bettycrocker.com/baking/basics/high_altitude_baking.aspx
http://extension.usu.edu/files/publications/highalt.pdf
Showing posts with label canning. Show all posts
Showing posts with label canning. Show all posts
Tuesday, April 20, 2010


Monday, May 4, 2009
Funnel Fundamentals
Moving food from the bowl or the cooking pot to the jar can be a messy affair. Drips and spills are inevitable, and having boiling hot food running down the jar while you’re trying to handle it isn’t fun. Sticky syrups are the worst. So, what do you do?
Enter the canning funnel. This remarkable adaptation of the traditional cooking funnel has a wider opening at the base and thanks to the marvels of scientific engineering, it fits beautifully in pint or quart jars. Here’s a picture of my green canning funnel. A few posts down the road you’ll get to see it in action.
Older canning funnels were made of aluminum with a little handle at the side. The handle heated up and was difficult to grasp. Newer ones are made from space-age plastics and have a handle a linebacker could hang onto.
You need a canning funnel to make the job easier and safer. Check the canning section of your local hardware store. I bought mine locally, and this is a good time to do that- Become a locavore!
Enter the canning funnel. This remarkable adaptation of the traditional cooking funnel has a wider opening at the base and thanks to the marvels of scientific engineering, it fits beautifully in pint or quart jars. Here’s a picture of my green canning funnel. A few posts down the road you’ll get to see it in action.

Older canning funnels were made of aluminum with a little handle at the side. The handle heated up and was difficult to grasp. Newer ones are made from space-age plastics and have a handle a linebacker could hang onto.
You need a canning funnel to make the job easier and safer. Check the canning section of your local hardware store. I bought mine locally, and this is a good time to do that- Become a locavore!
Sunday, May 3, 2009
Accessorizing Your Canner
Safety is always Job #1 in home food preserving. Anything you can do to ensure your worksite is as safe as it can be, is good. From your experience in cooking, you know how important potholders are. They work by providing a level of insulation between your fingers and hot cookware. Canning, however, introduces another element: hot water. And we’re talking boiling hot.
When potholders get wet, they’re worse than not having anything at all. You may have had the unpleasant experience of grabbing a wet potholder to lift a lid on a hot pot and found that you dropped it fast. You may also have gotten a slight burn in the process.
You want a short stack of potholders by your stove, to be sure, and you want to be sure to replace them with dry ones as necessary. However, their use is limited. They’re designed to lift pot lids. To get those filled jars into the canner safely and to remove them safely once they’ve finished processing, you need a jar lifter.
A jar lifter is not a luxury. It’s a necessary item. It provides you with safe distance between the boiling hot water and the jars that have gone into and come out of it. Here’s a picture of one in action.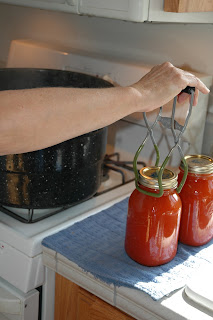
It works like a clamp, although one that opens and releases easily. Simply hold it in one hand and position the ends around the neck of the jar. It does exactly what the name implies. It lifts. It allows you carry the jar away from the canner and position it on a clean, dry surface where the jar will cool down.
You can find jar lifters at any store that sells canning supplies: hardware stores, the big discount chains (such as Walmart), and the larger grocery chains are some sources. You can also find them online.
Hint: when the canning season is over, store it inside the canner and you’ll not have to search madly for it next season.
When potholders get wet, they’re worse than not having anything at all. You may have had the unpleasant experience of grabbing a wet potholder to lift a lid on a hot pot and found that you dropped it fast. You may also have gotten a slight burn in the process.
You want a short stack of potholders by your stove, to be sure, and you want to be sure to replace them with dry ones as necessary. However, their use is limited. They’re designed to lift pot lids. To get those filled jars into the canner safely and to remove them safely once they’ve finished processing, you need a jar lifter.
A jar lifter is not a luxury. It’s a necessary item. It provides you with safe distance between the boiling hot water and the jars that have gone into and come out of it. Here’s a picture of one in action.

It works like a clamp, although one that opens and releases easily. Simply hold it in one hand and position the ends around the neck of the jar. It does exactly what the name implies. It lifts. It allows you carry the jar away from the canner and position it on a clean, dry surface where the jar will cool down.
You can find jar lifters at any store that sells canning supplies: hardware stores, the big discount chains (such as Walmart), and the larger grocery chains are some sources. You can also find them online.
Hint: when the canning season is over, store it inside the canner and you’ll not have to search madly for it next season.
Tuesday, April 21, 2009
Green Beans
There've been some questions about green beans recently, so here's the skinny.
Some varieties of beans are best put by in the freezer, while others handle the canning process quite nicely. Be sure to read the seed catalogue descriptions, when you are planning your garden, so you are not disappointed with the final product. Vesey and Burpee are good about that, and both companies carry varieties that do nicely with short seasons.
Canning does not improve the quality of the food put by. If beans are past their prime, they’re not going to get any better by dumping them in jars and pressure cooking them. You’ll have much better results, if you can beans that are slightly immature.
Because green beans are low-acid, they must be pressure canned to ensure safety. At our elevation (about 3,000 feet),that means 20 minutes for pints, 25 minutes for quarts at 12 pounds pressure. You do have choices, as to hot or cold pack and whether to salt or not, and that is nice. Salt is only added for taste, not to preserve. You may can beans whole (tip and tail them first) or cut into one inch pieces for convenient additions to soups and stews.
For hot pack, cover beans with boiling water. Boil 5 minutes. Pack loosely in canning jars; add salt, if desired. Cover with boiling cooking liquid. Leave one inch head space.
For cold pack, pack tightly in canning jars; add salt, if desired. Cover with boiling water.
Processing time is the same for both methods.
Remember to vent your canner properly to be sure your foods are safely processed. Air trapped in a pressure canner lowers the temperature inside the canner. To vent a pressure canner, allow steam to escape steadily from the petcock for ten minutes, then close the petcock or put the weighted gauge on the canner.
Some varieties of beans are best put by in the freezer, while others handle the canning process quite nicely. Be sure to read the seed catalogue descriptions, when you are planning your garden, so you are not disappointed with the final product. Vesey and Burpee are good about that, and both companies carry varieties that do nicely with short seasons.
Canning does not improve the quality of the food put by. If beans are past their prime, they’re not going to get any better by dumping them in jars and pressure cooking them. You’ll have much better results, if you can beans that are slightly immature.
Because green beans are low-acid, they must be pressure canned to ensure safety. At our elevation (about 3,000 feet),that means 20 minutes for pints, 25 minutes for quarts at 12 pounds pressure. You do have choices, as to hot or cold pack and whether to salt or not, and that is nice. Salt is only added for taste, not to preserve. You may can beans whole (tip and tail them first) or cut into one inch pieces for convenient additions to soups and stews.
For hot pack, cover beans with boiling water. Boil 5 minutes. Pack loosely in canning jars; add salt, if desired. Cover with boiling cooking liquid. Leave one inch head space.
For cold pack, pack tightly in canning jars; add salt, if desired. Cover with boiling water.
Processing time is the same for both methods.
Remember to vent your canner properly to be sure your foods are safely processed. Air trapped in a pressure canner lowers the temperature inside the canner. To vent a pressure canner, allow steam to escape steadily from the petcock for ten minutes, then close the petcock or put the weighted gauge on the canner.
Thursday, April 16, 2009
Food Safety -Finale
Last week we covered important aspects of preventable foodborne illness, specifically botulism, which is caused by a toxin produced in food by the bacteria, Clostridium botulinum. Using approved recipes and approved procedures makes botulism nothing more than an interesting topic. This week we finish up. For those of you who think botulism only results from improperly home-canned food and have therefore decided to avoid Aunt Mabel’s green beans forever, read on! Her properly home-canned food might be the safest food around.
Botulism has occasionally been caused by foods that were not vacuum-sealed by caning. Smoked fish can develop anaerobic conditions under the skin and in the visceral cavity. Baked potatoes wrapped in foil and meat pies have also been the cause of botulism. A large pot of sautéed onions left in a warm place resulted in botulism cases from persons eating the onions. Garlic in oil also caused multiple cases of botulism at a Canadian restaurant. Pickled eggs left at room temperature developed botulism in the yolk, which had been pricked with a toothpick, before the acid pickling solution was able to equilibrate throughout the egg.
Each of the above instances was preventable. Repeat the mantra: “Wash, scrub, refrigerate or freeze.” To prevent botulism toxin from forming in non-canned foods, low-acid foods must be refrigerated after they are cooked. Long-term storage of smoked fish should be in the freezer. This is because type E Clostridium botulinum, which is found in fish, can produce toxin at refrigerator temperatures. Smoked fish can be safely stored in the fridge for up to two weeks.
For low acid foods that are pickled, vinegar must be added in sufficient quantity to lower the pH to below 4.6. The vinegar in pickling recipes must be at least 5 per cent acidity. Approved pickling recipes are provided by Extension offices or the USDA Complete Guide to Home Canning.
Botulism symptoms include difficulty in swallowing, speech, and respiration and double vision. Respiratory failure may cause death. Before 1950, fatality rates from botulism were about 50 per cent, but with availability of antitoxin and modern respiratory support systems, the death rate has decreased to about 10 per cent. Still, if you are in that unlucky percentile, your death is 100 per cent guaranteed, and that is not good.
If you cannot get enough of this fascinating topic, additional information can be found in The Bad Bug Book, www.cfsan.fda.gov/~now/intro.html
Botulism has occasionally been caused by foods that were not vacuum-sealed by caning. Smoked fish can develop anaerobic conditions under the skin and in the visceral cavity. Baked potatoes wrapped in foil and meat pies have also been the cause of botulism. A large pot of sautéed onions left in a warm place resulted in botulism cases from persons eating the onions. Garlic in oil also caused multiple cases of botulism at a Canadian restaurant. Pickled eggs left at room temperature developed botulism in the yolk, which had been pricked with a toothpick, before the acid pickling solution was able to equilibrate throughout the egg.
Each of the above instances was preventable. Repeat the mantra: “Wash, scrub, refrigerate or freeze.” To prevent botulism toxin from forming in non-canned foods, low-acid foods must be refrigerated after they are cooked. Long-term storage of smoked fish should be in the freezer. This is because type E Clostridium botulinum, which is found in fish, can produce toxin at refrigerator temperatures. Smoked fish can be safely stored in the fridge for up to two weeks.
For low acid foods that are pickled, vinegar must be added in sufficient quantity to lower the pH to below 4.6. The vinegar in pickling recipes must be at least 5 per cent acidity. Approved pickling recipes are provided by Extension offices or the USDA Complete Guide to Home Canning.
Botulism symptoms include difficulty in swallowing, speech, and respiration and double vision. Respiratory failure may cause death. Before 1950, fatality rates from botulism were about 50 per cent, but with availability of antitoxin and modern respiratory support systems, the death rate has decreased to about 10 per cent. Still, if you are in that unlucky percentile, your death is 100 per cent guaranteed, and that is not good.
If you cannot get enough of this fascinating topic, additional information can be found in The Bad Bug Book, www.cfsan.fda.gov/~now/intro.html
Friday, April 10, 2009
Food Safety Issues
Reading about the recalls of packaged salad mix and packaged spinach got me thinking about toxins that can cause illness, specifically E. coli and Clostridium botulinum, commonly referred to as botulism. We live in strange times, indeed, when women have botox injections to smooth out wrinkles. Yessir, nothing like pumping your face full of deadly poison to get that baby-smooth complexion.
What is botulism? Glad you asked.
Botulism is caused by a toxin that is produced in food by the bacteria, Clostridium botulinum, which is found in soil all over the world. The soil in the western United States is high in type A Clostridium botulinum, which is the most dangerous type to humans. Alaska and Washington have the highest rates of botulism occurring in soils.
This bacteria forms spores, which are very resistant to heat, chemicals, and physical stress. When the spores grow, they produce the deadly neurotoxin that causes botulism.
The frequency of botulism cases is rare, but each year several outbreaks occur. Often these are caused by improperly home-canned foods. Fish, green beans, corn, beets, spinach, asparagus, and chili peppers are the most common foods implicated in botulism cases. Recently a case involved home-prepared “pickled” eggs.
Several conditions are necessary for a botulism outbreak. First, the botulinum organism must be in the food. Second, the acidity level must be low. The organism cannot grow when the acid level is high. A pH level of 4.6 or less means conditions are not right for the growth of Clostridium botulinum. Most types of this organism grow best at warm temperatures; however, growth has been observed at temps as low as 38 degrees Fahrenheit and as high as 118 degrees Fahrenheit. The organisms cannot grow if air or free oxygen is available. Oxygen-free (anaerobic) conditions occur when food is canned.
Home food preservers understand the necessity for pressure canning foods that are low acid. That means processing these foods at higher temperatures than just boiling, if we are to destroy the extremely heat-resistant botulism spores. Just because your jar has sealed, doesn’t mean you have a safe product. Processing foods under pressure raises the temperature inside the canner to a level that does destroy these nasty spores. That temperature is 240 degrees Fahrenheit and can only be achieved by pressure canning, which can be thought of as simply “higher-temperature” canning. Properly home-canned food is safe. For an extra guarantee of safety, home-canned veggies, meat, and fish may be boiled for ten minutes at 1,000 feet altitude before eating. Boiling destroys the botulism toxin. Remember to add an additional minute boiling time for each additional 1,000 feet of elevation.
Next week we’ll finish up this delightful topic. A parting thought: mistakes most often occur at two times in our lives. The first time is when we are learning a skill, and the second is when we get sloppy, careless, and take shortcuts, because we have been doing something for a very long time. It’s good practice to review the rules and instructions before we begin anything. Better safe than sorry, to use an old and very true aphorism.
What is botulism? Glad you asked.
Botulism is caused by a toxin that is produced in food by the bacteria, Clostridium botulinum, which is found in soil all over the world. The soil in the western United States is high in type A Clostridium botulinum, which is the most dangerous type to humans. Alaska and Washington have the highest rates of botulism occurring in soils.
This bacteria forms spores, which are very resistant to heat, chemicals, and physical stress. When the spores grow, they produce the deadly neurotoxin that causes botulism.
The frequency of botulism cases is rare, but each year several outbreaks occur. Often these are caused by improperly home-canned foods. Fish, green beans, corn, beets, spinach, asparagus, and chili peppers are the most common foods implicated in botulism cases. Recently a case involved home-prepared “pickled” eggs.
Several conditions are necessary for a botulism outbreak. First, the botulinum organism must be in the food. Second, the acidity level must be low. The organism cannot grow when the acid level is high. A pH level of 4.6 or less means conditions are not right for the growth of Clostridium botulinum. Most types of this organism grow best at warm temperatures; however, growth has been observed at temps as low as 38 degrees Fahrenheit and as high as 118 degrees Fahrenheit. The organisms cannot grow if air or free oxygen is available. Oxygen-free (anaerobic) conditions occur when food is canned.
Home food preservers understand the necessity for pressure canning foods that are low acid. That means processing these foods at higher temperatures than just boiling, if we are to destroy the extremely heat-resistant botulism spores. Just because your jar has sealed, doesn’t mean you have a safe product. Processing foods under pressure raises the temperature inside the canner to a level that does destroy these nasty spores. That temperature is 240 degrees Fahrenheit and can only be achieved by pressure canning, which can be thought of as simply “higher-temperature” canning. Properly home-canned food is safe. For an extra guarantee of safety, home-canned veggies, meat, and fish may be boiled for ten minutes at 1,000 feet altitude before eating. Boiling destroys the botulism toxin. Remember to add an additional minute boiling time for each additional 1,000 feet of elevation.
Next week we’ll finish up this delightful topic. A parting thought: mistakes most often occur at two times in our lives. The first time is when we are learning a skill, and the second is when we get sloppy, careless, and take shortcuts, because we have been doing something for a very long time. It’s good practice to review the rules and instructions before we begin anything. Better safe than sorry, to use an old and very true aphorism.
Subscribe to:
Posts (Atom)
About Me
.JPG)
- KK Brees
- I've been dabbling in learning German most of my adult life. Now it's crunch time. Fluency by December 31,2020. Come join me on my Final Approach to Learning German.

.JPG)
.jpg)


 Posts
Posts


